
I saw this Maternity Halloween Skeleton shirt idea first over here but no one could find where to buy the iron on so I decided to try my first freezer paper stenciling. I would have loved to have bought this one off of etsy since I'm a perfectionist but unfortunately didn't have time since I needed it today.
The cost breakdown:
Target long sleeved black shirt: $10
Humongous roll of freezer paper (couldn't find a small roll) $6
White fabric paint: $1.50
Pink fabric paint: $1.50
Sponge brush: already had
Exacto knife: already had but definitely should have bought replacement blades (you probably will go through a couple if you keep a sharp blade installed). My stencil was terribly difficult to cut out because I had a dull blade and wouldn't go back to the store to buy more.

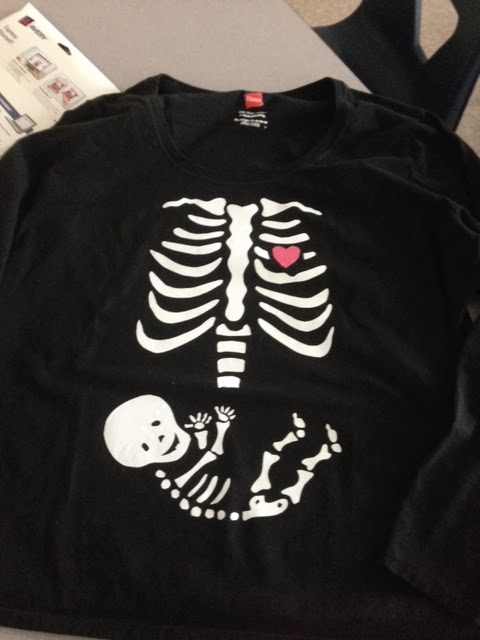
Here is the finished product. It looks cuter in person. And pretend you don't see the missing rib bone above the heart. I was too lazy to fix it when I figured out I forgot to trace one. I don't think you can tell or can you?

Here is a picture of all the supplies needed.

First, I didn't have a pattern so I saved the picture of this lovely lady displaying her Halloween shirt (make sure you click on the picture so you can get the largest picture possible) and opened it up in gimp (a free photo editing program) cropped only the image that I wanted to stencil and then zoomed until it was the size I desired for my pattern. Taping a piece of copy paper on my computer screen I first traced the rib cage and then scrolled down and traced the baby on a second piece of paper and then taped them to together so it would be the appropriate size because the whole image would fit on my computer screen. If I had this to do over I would have just taped the freezer paper on the computer screen and traced it on there so you don't have to cut through two layers of paper.
Next, tape your pattern (if you trace it onto copy paper first) onto your freezer paper and use your exacto knife to cut out your pattern.

This is what your pattern should look like after you cut it out with your exacto knife.

Next, iron a piece of freezer paper on the inside of your shirt shiny side up to absorb any pain that might leak through and to prevent bleeding.

Turn your shirt right side out and iron your stencil on the front, shiny side down. Make sure there are no air bubbles or the paint will leak through. Then using your foam brush paint carefully on the stencil. Try and brush from the edges inward, this helps from the paint leaking under your stencil. I tried to do this but I wasn't too careful and everything was fine. I found pouncing the foam brush like you would a regular stencil helped me. Let dry overnight and then heat set it with an iron. Voila your very own pregnancy costume with baby included. I would have loved to made mine with a pink bow but I won't find out the sex until Monday :(
Update: While my daughter was trick or treating at her Grandparent's house the local paper came around with a school food drive and I was put in their small town of Fort Gibson, OK newspaper. I decided to put it in since I thought the picture of the shirt turned out pretty good.

Update this time 2012.
I made this again but this time for my niece. She came to visit while she was pregnant and remembered me wearing it. This time I used my Silhouette, that I didn't have then. I have the files but am unsure how to file share. So, if anyone wants it just email me or leave a comment. Please specify if you want the pdf or Silhouette file (you have to have a SILHOUETTE MACHINE to use the Silhouette file). If you have the Silhouette Cameo I would adjust the width to accomodate your body size. My file size is for 8 inches in width because this is how wide the Silhouette SD will cut. The only thing I ask is that you don't post or share these file as your own:)
Hopefully, I am doing this right. I had so many people request these files I decided to branch and and to finally figure out (HOPEFULLY) how to share my files. I can no longer keep up with the requests. I'm so happy so many people are being creative. Remember I would still LOVE to see your pictures of your finished product.
Baby Part - PDF
Skeleton Part - PDF
Baby Part - Silhouette Users
Skeleton Part - Silhouette Users
It was a ton easier this time since the exacto knife method is a little time consuming especially on the smaller parts, like the toes. I also put two coats of paint on this time and it made is much brighter. I also rushed the process by using the hair drying to dry it since she came on Halloween and I wanted to finish it while she was there so I would put the baby in the right place. I think I could have even moved it down a little bit. Oh, and I couldn't find a straight sided black maternity shirt that didn't have the ruching on the sides and I thought it would be a problem but it wasn't at all. I love how it turned out again!


Here is an up close view.

I also added a little bow to her baby since she know she is having a girl. I chose not to do a face like all of the other ones (on mine and on hers) because it looked kind of creepy to me.
And DON'T FORGET to send me a picture of when you get finished making your shirt. I love seeing all the crafty people out there!

2013: Here is the latest reader's Halloween Skeleton & Baby Maternity Shirt. Great Job, Allison! From Allison: " I used it to announce my pregnancy to friends. I wore it under a jacket then just took it off to see who noticed. It came out great - thanks for the helpful instructions!"
Sorry, if you have sent me a picture and you don't see it here. I get TONS of emails and I've tried to look back through them to get the pictures you guys have sent me but going through literally thousands of emails they some how have gotten deleted. Send them, again! Please. Put in the subject picture attached so I will know which ones are which. Love the pictures!

Here is a picture from reader Evelyn after she finished her shirt. She said now her son wants one too! Great job, Evelyn.

My husband's is the "Beer and chicken drumstick", my son's is the "Juice box, candy, and gold fish", and mine is obviously the baby one :), my daughter's finished product. I "jazzed" it up with a bow that matches the one in her hair and a tutu. She's a girly girl. :)

Thank you for your easy to follow steps. Looking forward to wearing these to a Halloween Party to announce to friends that are nearby!
Liz Hunt

Here is my shirt. I think I may add the Superman symbol, because we're having a boy. Thank you so very much for your templates :)
Michelle White
.jpeg)

The shirt was a hit! Everyone loved it :)
Hannah Strauss
.jpeg)
Here is our skeleton family! Thanks again for the files!
Not perfect as I was still blow drying the paint at 1 o'clock for a 2 o'clock party!! It was fun and everyone thought it was great!
Kate Reinbold Mismash

We got it to work! Thank you so much for your time helping out. Sadly I had to get it cut again since it was cut backward and then had to hurry to get it finished in an hour (paint and drying)...it clumped up and pulled off but still worked out! It was so fun for everyone to figure out my announcement through my costume! Thanks again for all your effort in making this happen. :-)
Sarah Lewis
.jpeg)
Hello Lisa! I made this today with iron-on transfers. Not as fancy as the freezer paper method, but quick and easy for those if is who are not artistically inclined. Thanks again for the template!
Katie


Thank you again so much! It turned out great. Ended up getting a iron on paper, traced the skeleton, cut, peeled and ironed. The little pieces were hard, ended up using a paint marker to do the toes, and cut out my own fingers for the baby.
Kim Mattice

These worked perfect! I had some extra heat-transfer vinyl, so I flipped the images and did it that way. I LOVE how it turned out, thanks for saving me the trouble of designing it myself!
Sara (baby #5, by the way!)

Oh and if you couldn't tell we are having a girl.
Thanks again,
Janae


Megan Steele
.JPG)
It's not the best picture, but rain downtown made it hard to pose! Thanks again! I was stopped a lot and asked about the shirt!
Kelly

Thanks so much for the skeleton pdf file! I absolutely loved my Halloween shirt!!
Kristen


Kristen

Here is my finished shirt! Thanks so much for sending the files to me :)
-Kim

I wanted to thank you for this awesome step by step blog on how to make this very fun shirt. I did mine last night. My sister helped me paint it. Took 6hrs from start to finish and I LOVE IT! This is my first baby so I wanted a fun maternity Halloween costume but not a creepy one. Thanks again. Here's the photos of my shirt and me wearing it.
Sincerely,
Alisha Dickenson
P.S. I'm having a boy but I didn't have any ribbon to make a little bow tie!
 Hi Lisa!
I got 2 shirts made, one for my cousin and one for my friend. Only my
friend returned a pic wearing it, but she doesn't know the baby gender
yet. By her side is her first daughter wearing a shirt I gave along
with her mother's. It reads (backwards, in Portuguese) "I've got a
promotion! From family's baby to older sister!"
Thanks again for the pattern!
Angeline

This is the husband's shirt.

I added the hat I think it looks okay couldn't figure out how to make it look better but it works and I love the shirt I wore it to my doctors appointment today and every there loves it.
Tabatha Brockman


I added the hat I think it looks okay couldn't figure out how to make it look better but it works and I love the shirt I wore it to my doctors appointment today and every there loves it.
Tabatha Brockman

Well from far away it looks great, up close, a lil rough lol but I love it. Thanks for sharing the stencil and info. I had a hard time getting the f.p. stencil off once dry, because I put to much paint on. I also used puffy paint cuiz that's all I had. I used a pearly white for first coat and white on top n i think bit gave it a nice sheen/touch

Dawn R

The shirt turned out great! Thanks so much for the PDF!
Jessica

Hi Lisa,
Here is a pic of the skeleton shirt I made. (Ignore my zombie husband lol) Made a little different with white glitter fabric paint. Its a girl so we added a little pink bow. Thanks again for sending the pattern to me.
Kendra

Thank you so much for your stencils. I wanted it to look like an x-ray so used white glitter paint. I was so excited with the final project.
Again thank you.
Elizabeth Willey


The shirt turned out great! I also made one for my hubby with beer bottle outlines. And the one I made for me I changed the head silouhette to a storm trooper helmet since my hubby and I are big star wars fans.
Thanks for everything!
Thanks,
Shannah Phillips

I had about 2 hours before a Halloween party and I didn't fit in any of my old costumes, being pregnant with triplets will do that to you. I ran over to the craft store and got some heat transfer vinyl for my silhouette and downloaded your template. I made a costume for me and for my husband too in less than an hour! I made 3 of the babies and sewed on 2 bows, since we are having 2 girls and a boy (btw this is number 4, 5, and 6 for us!). The costume was a hit! Thank you so much!

Thanks Lisa,
It came out great and was a great way to announce our pregnancy!It was fabulous!Thanks!Alysha


Here is my shirt from today. Thank you for the PDF files. Couldn't have done it without them. As I mentioned, I used white contact paper for my stencil. It worked great. Once I had my stencil cut out I just peeled the back off and stuck it right to the shirt. It took about 4 coats of white and several hours of patience. I also decided to make my heart out of red felt for a 3D effect. I attached a red hair bow to the baby too since we are expecting a Christmas Eve baby girl. :) I am quite big now so I made my baby larger than some of the other moms did. I have a 32 inch computer monitor so I just blew it up a bit from the PDF's original size until it was more proportionate with my current size and then I traced the baby skeleton for the stencil. It was a huge hit! Thanks again!
Amanda

Casey


