Showing posts with label Recipes. Show all posts

Friday, February 17, 2012

Fruit Pizza


I made this fruit pizza for the Super Bowl.  It turned out pretty good or at least it turned out pretty:)
I found it on Pinterest from here.  Big suprise, huh.
I think next time I will try the picture above of the mini version.  They would be the same just smaller and easier for little hands to eat.  Since, I did make this for the kids.

I also would alter the recipe a little.  I would change the frosting to this recipe.


Friday, February 11, 2011

Valentine's Day Egg in a Nest


My little girl loves eggs so, I thought I would change it up a bit and make an egg in a nest or you might call it a heart in a nest.  All you do is cut out the center of the bread with a cookie cutter and then break egg into the open hole.

Sunday, June 6, 2010

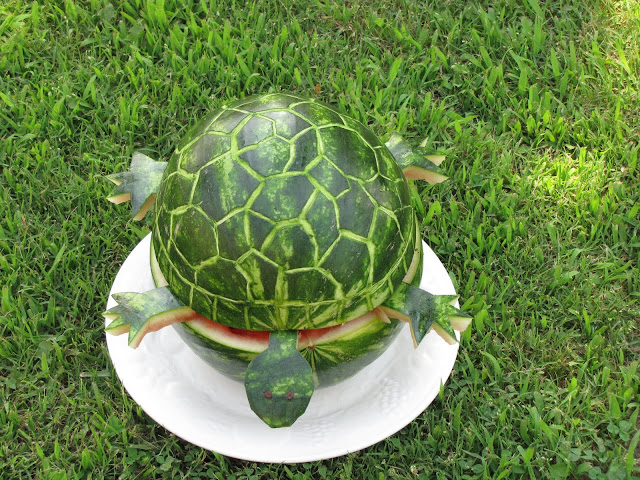
Turtle Watermelon Carving!

I saw this cute turtle carving here. So last weekend I thought I would do a trial run one before my daughter's safari birthday party.  What do you think?  Do you think mine turned out ok?

Wednesday, March 31, 2010

Appetizers in the garden?

If you have time I think this would be great for Easter, but on a smaller scale.  I saw this previously here and thought this would also be great for a Birthday or summer get together.  It was originally used for a wedding.

Thursday, February 4, 2010

Did You Know? You Can Use a Can of Pumpkin in a Cake Mix instead of Eggs & Oil.

I consider myself a pro at lowering calories in recipes, but this one was new to me.  Did you know.....you can substitute a can of pumpkin instead of using eggs and oil?  It is supposed to taste the same as if you were to use the oil and eggs. What a wonderful way to cut the calories.  I can't wait to try it out.

I would really like to try this on some unsuspecting guest to see if they could tell the difference.  I think that is the true test when you have no clue that the recipe is altered until after you've tried it.

Tuesday, January 12, 2010

No-Bake Strawberry Cheesecake Recipe


Photo courtesy of: womansday.com

I'm on a diet but, I couldn't help but see this mouth watering no-bake strawberry cheesecake recipe from Woman's Day magazine May 10, 2005.  It's supposed to be low-fat........wonderful but if you look at the nutrition facts it says, yields 1 cheesecake.  I get so frustrated when it doesn't specify what a serving size is.  Am I supposed to assume that a serving size is a whole cheesecake.  Yes, I know that's not what it means but a girl can dream, right? 

Anyhoo, I love cheesecake and this sounds like a delicious one that I wanted to share. 

Nutrition Facts:
Yield 1 cheesecake
Amount Per Serving

Calories 164
Total Fat 2g
Saturated Fat 1g
Cholesterol 11mg
Sodium 420mg
Total Carbohydrates 23g
Dietary Fiber 1g
Protein 11g
Active Time: 25 minutes

Total Time: 4 hours 25 minutes

INGREDIENTS

Crust

6 whole lowfat honey graham crackers (2‑squares each), crushed to fine crumbs
2 Tbsp butter, melted, and mixed with 1 Tbsp honey

Filling

1 box (3 oz) strawberry-kiwi flavor gelatin
2⁄3 cup boiling water
1 tub (16 oz) 1% fat cottage cheese
2 bricks (8 oz each) fat-free cream cheese, softened
2 Tbsp sugar
2 tsp strawberry extract or 1 tsp vanilla extract

Topping

1 pt (about 12 oz) fresh strawberries
2 Tbsp strawberry jelly, melted

Garnish: small mint leaves

PREPARATION

1. Coat an 8 x 3-in. springform pan with nonstick spray.

2. Crust: Mix crumbs with butter mixture until evenly moistened. Press firmly over bottom and 3⁄4 in. up side of prepared pan. Place in freezer.

3. Filling: Dissolve gelatin in boiling water in a 1-cup measure. Purée cottage cheese in food processor until creamy. Add gelatin, cream cheese, sugar and extract; process until smooth. Pour into prepared crust; smooth top. Cover and refrigerate 4 hours, or until set.

4. Topping: Wash and dry berries; remove stems. Quarter each lengthwise and place in a bowl; add jelly and gently toss to coat. Remove sides of springform pan; place cheesecake on serving plate. Spoon on berry mixture; sprinkle with mint leaves.

Planning Tip: Can be made, without the strawberry topping, up to 3 days ahead. Refrigerate covered. Prepare Topping just before serving.

Tuesday, January 5, 2010

Valentine's Day: Heart Shaped, Strawberry Flavored, Homemade Marshmallows!


I know it's only January 5th but, I always like to try my recipes before they go out to someone.  So, I tried making homemade marshmallows.  The first one's I tried were Meyer Lemon Marshmallows.  Yuck!  I personally didn't like those at all. 

Next, I tried strawberry flavored ones.  Yum, they are a winner.  I plan on giving both grandparents 8 packaged strawberry marshmallows, candy cane heart sucker (from clearanced mini candy canes), a silhouette valentine card, and maybe a silhouette framed of there sweetie pie granddaughter.  Well that what I plan to do anyhow.

On with the marshmallows.  Here is the recipe I used:

Homemade Marshmallows
.75-oz unflavored gelatin (3 envelopes of Knox gelatin)
1/2 cup cold water
2 cups granulated sugar
2/3 cups light corn syrup
1/4 cup water
1/4 teaspoon salt
1 tablespoon vanilla extract
(I substituted and used 1/2 cup pureed frozed strawberries)

Line 9 x 9-inch pan with plastic wrap and lightly oil it. Set aside.

In the bowl of an electric mixer, sprinkle gelatin over 1/2 cup cold water. Soak for about 10 minutes.
(I also don't have a Kitchenaid stand mixer, which I think is best for this job.  But, my hand held mixer did fine.)

Meanwhile, combine sugar, corn syrup and 1/4 cup water in a small saucepan. Bring the mixture to a rapid boil and boil hard for 1 minute.

Pour the boiling syrup into soaked gelatin and turn on the mixer, using the whisk attachment, to high speed. Add the salt and beat for 12 minutes. After 12 minutes, add in the vanilla extract beat to incorporate.

Scrape marshmallow into the prepared pan and spread evenly (Lightly greasing your hands and the spatula helps a lot here). Take another piece of lightly oiled plastic wrap and press lightly on top of the marshmallow, creating a seal. Let mixture sit for a few hours, or overnight, until cooled and firmly set.

In a shallow dish, combine equal parts cornstarch and confectioners' sugar. Remove marshmallow from pan and cut out with a small heart cookie cutter.  You need to get the deep metal cookie cutters because the marshmallow is quite thick.  I also used a pastry brush and oiled the cookie cutter about every 4th cut so, it wouldn't stick.  Dredge each piece of marshmallow in confectioners' sugar mixture.

Store in an airtight container.

Makes about 20 large heart shaped marshmallows, depending on the size of your cookie cutter.


I Heart Hot Chocolate!

Packaged and ready to go!

Thursday, December 17, 2009

Lemon Spaghetti Recipe: Using California Olive Oil


I was given the opportunity to try California Olive Ranch Extra Virgin Olive Oil (EVOO) courtesy of MomSelect.  I love using olive oil to cook with because it has healthy omega 3 fats unlike vegetable oil that I used in the past until I found out how great olive oil is for you.

Did you know that extra virgin olive oil is the top grade....and the most expensive?  True extra virgin olive oil (EVOO) can't have flavor "defects" - moldy olives, for example, can make the oil musty.  California is the only state that has legally adopted the international standards for any olive oil sold in the state. Wow, this information was new to me until recently that I wanted to share with you too.

I have one recipe in particular that I love that I use olive oil in which is lemon spaghetti.  I hope you like it too.  It's quick, easy, and light.

Lemon Spaghetti
Prep Time: 10 min Inactive Prep Time: -- Cook Time: 8 min Level:

Easy Serves: 6 servings

Ingredients
* 1 pound spaghetti
* 1/3 cup olive oil
* 2/3 cup grated Parmesan
* 1/2 cup fresh lemon juice (about 3 lemons)
* Salt and freshly ground black pepper
* 1 tablespoon lemon zest
* 1/3 cup chopped fresh basil leaves

Directions

Cook the pasta in a large pot of boiling salted water until tender but still firm to the bite, stirring occasionally, about 8 minutes. Meanwhile, whisk the oil, Parmesan, and lemon juice in a large bowl to blend.

Drain the pasta, reserving 1 cup of the cooking liquid. Toss the pasta with the lemon sauce, and the reserved cooking liquid, adding 1/4 cup at a time as needed to moisten. Season with salt and pepper. Garnish with lemon zest and chopped basil.

You can also use linguini if you don't have spaghetti on hand.  I usually add shrimp to mine too.  It just seems to stay with you longer if have some type of meat in it.

Saturday, October 31, 2009

Witch's Brew Halloween Punch!


I've never used dry ice before and so this was really fun (even for an adult).  For the punch I mixed together a tub of lime sherbet and a 2 liter of sprite on top of a big chunk of dry ice and the smoke began.  Doesn't it look cool!  I was surprised at how many people haven't seen dry ice in punch before.

By the way I got the dry ice at my local grocery store they sell it up front in a cooler.  Please read all the safety and handling precautions it can be dangerous.  Use common sense!
 
Update 2013:
I've been getting a lot of traffic because of my little o'l Halloween Punch....who knew.  Baffles me at what this blog gets the most traffic from.  I love this Witch's Brew that I originally saw done in 1st grade at our school Halloween party and was A.MAZ.ED! I know. I know. It doesn't take much but I was only 6. Give me a break!
 
I did this again last year at a friend's Halloween party but they were a little more cautious and were afraid to just put the whole chunk in there even though when I did it before it just sunk to the bottom of the bowl. YOU ARE NOT TO TOUCH THE DRY ICE WITH BARE HANDS OR DRINK AND PART OF IT! I also did not let the kids serve their selves just to be sure they didn't touch it or get any.  All of my dry ice did stay in tact and did not break apart.  If I remember correctly. Any ways.  Long story short I agreed we should take some extra precautions.  I wrapped the dry ice in a piece of cheese cloth and tied it with a strip of the cloth for the tie.  This way you can make sure if the dry ice breaks apart none will get in the drinks.  YOU CAN'T INGEST IT AT ALL! If the smoke starts to die down then add more sprite. The warmth of the pop will make the smoke start again and bubble.


Saturday, October 24, 2009

Onesie Cookies for Baby Shower!

We'll I'm not sure why I decided to start with such a challenging cookie project for my first cookie icing experience.  But, anyways I did.  I have never iced a cookie in my life except for using the premade store bought kind before these cookies. 

Long story short, I saw these cookies on this blog and thought I can do that and I did.  They were VERY time consuming and there were lots of learning curves but, I pulled it off and my everyone loved them at the baby shower I helped my niece throw for her best friend.  Aren't they sooo cute.  I know they aren't perfect but, I was happy with the end result.


Monday, October 12, 2009

Spooky Spider Eggs!


We'll since a lot of people were able to snag the BOGO free coupon for eggs, including me, I was wondering now what am I going to do with all these eggs....four dozen to be exact!

I'm going to be throwing my first Halloween Party this year and I stumbled upon this great recipe for spooky spider deviled eggs from this wonderful party blog called Hostess with the Mostess. How cute is this! I will definitely be doing this for my party.

Thursday, September 24, 2009

Better Homes & Gardens - 100 Days of Holiday Cookies


Better Homes and Gardens online are having 100 days of holiday cookies from now and until New Years they will have a new holiday cookie recipe.  How fun!  I love baking trying to bake and I think the spritz blossoms cookies are too cute.  I just might "try" and make them this Christmas.

Monday, July 20, 2009

How To Make Homemade Fries


Well, I found myself with a plethora of potatoes and thought......what can I do with all of these potatoes? You know, besides the norm mashed potatoes and baked potatoes. So, I thought homemade french fries.

First, peel and slice your potatoes. Make sure you slice them all about the same size.

Second, soak them in water for about 30 minutes. This is supposed to help release the starches.

Third, dry them thoroughly. Make sure they are completely dry because they will steam in the oven and not crisp up if not dry.

Fourth, preheat oven to 400 degrees.

Fifth, lay them evenly on a cookie sheet and spray with olive oil. I have a misto that allows you to put olive oil in and it creates a spray. I LOVE it. But, if you don't have one of these ingenious gadgets. Then, just use a brush and brush them with olive oil.

Sixth, sprinkle them with salt and pepper or season of your choice.

Seventh, Bake for 45 minutes. Check periodically and turn to ensure even browning.

Last, but not least enjoy your "healthy" french fries.
Related Posts Plugin for WordPress, Blogger...